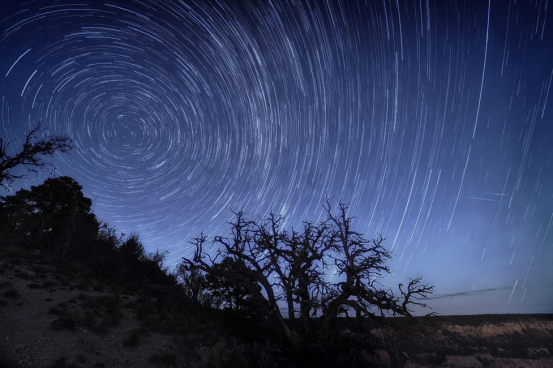
Astrophotography is a captivating genre that allows us to capture the ethereal beauty of the cosmos, from the majestic sweep of the Milky Way to the subtle dance of star trails across the night sky. Far from requiring an observatory, modern techniques and accessible equipment empower enthusiasts to create stunning celestial images. This comprehensive guide delves into the specifics of capturing breathtaking star trails, clearly defined constellations, and expansive wide-angle views of the night sky, catering to both advanced camera users and those leveraging the power of their mobile phones. Prepare to unlock the secrets to successful astrophotography, transforming fleeting moments under the stars into lasting photographic art.
Essential Gear for Capturing the Night Sky
The right equipment forms the foundation of any successful astrophotography endeavor. While professional setups can be extensive, many stunning images can be achieved with surprisingly minimal gear. Understanding the function of each component is crucial for making informed choices, whether you’re using a dedicated camera or a smartphone.
Camera Choices: DSLR, Mirrorless, and Mobile Phones
For serious astrophotography, a DSLR or mirrorless camera is often preferred due to their larger sensors, better low-light performance, and manual control over settings. Full-frame sensors generally offer superior noise performance at high ISOs compared to crop sensors. However, recent advancements in smartphone cameras, coupled with specialized apps, have made mobile astrophotography a viable and exciting option for beginners or those seeking portability.
- DSLR/Mirrorless: Look for models with good high ISO performance and the ability to shoot in RAW format for maximum post-processing flexibility.
- Mobile Phones: Modern flagship phones with “Night Mode” or manual controls are increasingly capable. Pairing them with a sturdy tripod and a remote shutter is non-negotiable for sharp results.
Lens Selection: Wide-Angle and Fast Apertures
The lens is arguably as important as the camera body. For wide-angle night sky photography, a fast, wide-angle lens is essential. “Fast” refers to a wide maximum aperture (low f-number, e.g., f/2.8 or wider), which allows more light to reach the sensor in dark conditions. “Wide-angle” (e.g., 14mm-24mm on a full-frame sensor) is critical for capturing expansive views of the sky, including the Milky Way or an entire constellation.
- Aperture Priority: Aim for lenses with an aperture of f/2.8 or wider to gather maximum light.
- Focal Length: Lenses between 14mm and 24mm (full-frame equivalent) are ideal for capturing vast portions of the night sky.
The Indispensable Tripod and Remote Shutter
Long exposure times are fundamental to astrophotography, making a sturdy tripod an absolute necessity. It eliminates camera shake, ensuring sharp, streak-free stars (unless you’re intentionally shooting star trails). A remote shutter release (wired or wireless) further minimizes vibrations from pressing the camera’s shutter button, or a self-timer can be used.
- Tripod Stability: Invest in a robust tripod that can securely hold your camera and lens, especially in windy conditions.
- Remote Trigger: Prevents camera shake during long exposures. For mobile phones, a Bluetooth remote or the phone’s timer function can serve this purpose.
Additional Accessories: Headlamps, Power Banks, and Warm Clothing
Beyond the core camera gear, several accessories enhance the astrophotography experience and ensure safety in the field. A headlamp with a red light mode preserves night vision. Extra batteries or a power bank are crucial, as long exposures drain power quickly. Given that astrophotography often occurs in cold, dark environments, warm clothing is vital for comfort and endurance.
- Red Light Headlamp: Essential for navigating in the dark without compromising your or others’ night adaptation.
- Power Management: Cold temperatures can significantly reduce battery life; always carry spares or a portable charger.
- Comfort and Safety: Dress warmly, bring snacks, and inform someone of your location, especially when venturing into remote areas.

Mastering Star Trail Photography Techniques
Star trail photography is a mesmerizing art form that captures the apparent motion of stars across the night sky, creating beautiful arcs of light. This effect is achieved through long exposures, either as a single extended shot or by stacking multiple shorter exposures. Understanding the underlying principles and precise settings is key to producing stunning results.
Understanding Earth’s Rotation and Star Movement
The “movement” of stars we observe is actually a reflection of the Earth’s rotation on its axis. Depending on your orientation to the celestial poles (North Star for the Northern Hemisphere, Sigma Octantis for the Southern), stars will appear to rotate around a central point. Capturing this rotation over time creates the distinctive arcs of star trails.
- Polaris as Anchor: In the Northern Hemisphere, pointing your camera towards Polaris (the North Star) will yield circular trails. Pointing east or west will result in more linear, diagonal trails.
- Southern Hemisphere: The celestial south pole is near the constellation Octans, around which stars will also appear to rotate.
Optimal Camera Settings for Star Trails (ISO, Aperture, Shutter Speed)
Achieving clear, continuous star trails requires a specific combination of camera settings. While a single, extremely long exposure (e.g., 30-60 minutes or more) can create trails, it often results in excessive noise and can be challenging to manage. The more common and recommended approach is to take numerous shorter exposures and stack them in post-processing.
- Aperture: Start with your lens’s widest aperture (e.g., f/2.8 or f/4) to gather maximum light.
- ISO: Experiment with ISO settings from 800 to 3200. Higher ISOs capture more light but introduce more noise. Find a balance that works for your camera and ambient light conditions.
- Shutter Speed: For individual frames in a stack, use a shutter speed between 15 to 30 seconds. This captures individual stars as points of light before they trail significantly, making them ideal for stacking software.
- Focus: Focus manually to infinity. Use Live View and zoom in on a bright star to achieve critical focus.
Composition and Foreground Elements
A compelling star trail photograph often includes more than just the sky. Integrating a strong foreground element (e.g., a tree, a mountain, an old building) adds depth, context, and visual interest, elevating the image from a mere scientific record to a piece of art. Ensure your foreground is well-lit or silhouetted appropriately.
- Rule of Thirds: Position your celestial pole or a key foreground element along the lines or intersections of the rule of thirds for balanced composition.
- Light Painting: Gently “paint” your foreground with a low-powered flashlight during one of the exposures to add subtle illumination.
The Art of Stacking Multiple Exposures
Stacking is the preferred method for star trail photography because it reduces noise and allows for greater control over the final image. By combining dozens, or even hundreds, of short exposures, software can effectively “paint” the trails while averaging out random noise from the individual frames.
- Intervalometer: An external or built-in intervalometer is crucial for automatically taking continuous shots with minimal delay between them.
- Stacking Software: Programs like StarStax (free) or specialized Photoshop actions can combine your individual frames into a single star trail image. Ensure each frame is consistent in exposure and focus.

Capturing Wide-Angle Starry Skies and Constellations
Beyond star trails, wide-angle astrophotography allows you to capture the grandeur of the Milky Way, prominent constellations, and expansive nightscapes, often integrating terrestrial elements. This approach demands meticulous planning and precise execution to reveal the faint beauty of our galaxy.
Finding the Darkest Skies: Light Pollution Maps
Light pollution is the nemesis of wide-angle night sky photography. Even subtle light domes from distant cities can obscure the Milky Way. Utilizing light pollution maps (e.g., Dark Site Finder, Light Pollution Map) is essential for locating truly dark skies, typically far from urban centers. Bortle Scale Class 1-3 skies are ideal.
- Research Locations: Prioritize national parks, remote deserts, or high-altitude areas known for dark skies.
- Check Forecasts: Clear, moonless nights are paramount. Even a thin cloud layer can ruin a shot.
Planning Your Shot: Moon Phases and Milky Way Core
Successful wide-angle astrophotography is heavily reliant on planning. The moon phase is critical; a full moon will completely wash out the Milky Way. Aim for the new moon phase or when the moon is below the horizon. For capturing the vibrant core of the Milky Way, know its visible window and position relative to your location and time of year using apps like PhotoPills or Stellarium.
- New Moon Cycle: Plan your shoots around the new moon for maximum darkness.
- Milky Way Position: Use augmented reality apps to visualize the Milky Way’s path in the sky at your chosen location and time.
Achieving Pinpoint Stars: Focusing in the Dark
One of the biggest challenges is achieving sharp focus on distant stars in complete darkness. Auto-focus systems are ineffective. Manual focusing is required, often using the camera’s Live View mode.
- Live View Method: Set your lens to manual focus. Point your camera at a bright star, planet, or distant light source. Engage Live View and zoom in digitally to its maximum. Carefully adjust the focus ring until the star appears as a tiny, sharp point of light.
- Infinity Mark: While many lenses have an infinity symbol, it’s rarely precise enough for astrophotography. Always verify with Live View.
Exposure Settings for Milky Way and Constellations
Unlike star trails, which often involve stacking, wide-angle Milky Way shots typically rely on a single, well-exposed frame. The goal is to capture as much light as possible without introducing star trails or excessive noise.
- Aperture: Use the widest possible aperture (e.g., f/1.4 – f/2.8).
- ISO: Start with a high ISO, typically between 3200 and 6400, and adjust based on your camera’s noise performance and ambient light.
- Shutter Speed: Use the “500 Rule” (or 400/300 Rule for crop sensors) as a guideline to prevent star trailing. Divide 500 by your lens’s focal length (e.g., 500 / 20mm = 25 seconds). This gives you the maximum shutter speed before stars begin to trail noticeably.
- White Balance: Set to Kelvin (e.g., 3800K-4500K) or Tungsten/Incandescent for a cooler, more natural sky color.

Mobile Phone Astrophotography: A Practical Guide
The notion that astrophotography is exclusive to professional gear is rapidly changing. With advancements in smartphone camera technology and sophisticated mobile applications, capturing impressive images of the night sky, including star trails and constellations, is increasingly within reach for mobile phone users. The key lies in understanding your phone’s capabilities and leveraging the right accessories and techniques.
Leveraging Smartphone Camera Capabilities
Modern smartphones, especially flagship models, boast impressive low-light performance and computational photography features. Many now include dedicated “Night Modes” that capture multiple frames and combine them to reduce noise and enhance detail. However, for true astrophotography, having manual control over settings like ISO, shutter speed, and focus is paramount.
- Manual Mode Apps: Utilize third-party camera apps (e.g., ProCamera, Halide, Lightroom Mobile) that offer full manual control over exposure settings.
- Native Night Mode: While helpful for general low-light, a dedicated night mode might not offer the granular control needed for specific astrophotography techniques like star trails.
Essential Mobile Accessories: Tripods and External Lenses
Just like with traditional cameras, a sturdy tripod is the most critical accessory for mobile astrophotography. Any movement during long exposures will result in blurry images. A dedicated phone mount is also necessary to attach your device to the tripod. For wider fields of view, certain external clip-on wide-angle lenses can enhance your phone’s native lens, though quality can vary.
- Smartphone Tripod Adapter: A secure mount is essential for attaching your phone to any standard tripod.
- Portable Tripod: Even a small, lightweight tripod can make a huge difference in image sharpness.
- External Lenses: Research reputable brands for clip-on wide-angle lenses if you wish to expand your phone’s field of view, but be aware of potential image quality compromises.
Recommended Mobile Apps for Astrophotography
Beyond manual camera control, several apps can significantly aid in planning and executing your mobile astrophotography shots.
- Stellarium Mobile/SkyView Lite: Excellent for identifying constellations, planets, and the Milky Way’s position in real-time using augmented reality.
- PhotoPills (Paid): A comprehensive planning tool for sun, moon, and Milky Way positions, ideal for advanced planning.
- Star Trails App (iOS/Android): Specifically designed to capture and stack multiple short exposures into a single star trail image directly on your phone.
Specific Settings for Mobile Star Trails and Night Sky
When shooting with a mobile phone, the settings will be more constrained than with a DSLR/mirrorless, but the principles remain similar. The goal is to maximize light capture while minimizing noise.
- ISO: Use the highest ISO your phone can manage without excessive noise (often 800-1600).
- Shutter Speed: For individual star trail frames, aim for 15-30 seconds. For single wide-angle night sky shots, push the shutter speed as long as possible without introducing star trails (e.g., 10-20 seconds), using the 500 Rule as a rough guide for your phone’s equivalent focal length.
- Focus: Manually set focus to infinity if your app allows, or tap on a distant bright star to try and acquire focus.
- Exposure Bracketing: Some apps allow bracketing, which can be useful for capturing a wider dynamic range.

Post-Processing Your Astrophotography Masterpieces
Post-processing is an integral part of astrophotography, transforming raw captures into stunning final images. It allows you to enhance faint details, reduce noise, correct color, and bring out the true beauty of the night sky. The techniques vary depending on whether you’re working with star trails or single wide-angle exposures.
Software for Stacking Star Trails
As mentioned, stacking multiple exposures is crucial for clean star trail images. Specialized software automates this process, aligning the stars and combining the light from each frame.
- StarStax: A popular, free, and user-friendly software for Windows, macOS, and Linux that excels at stacking star trail images. It offers various blending modes (e.g., “Lighten” for classic trails).
- Adobe Photoshop: While more complex, Photoshop can also stack images using layers and blending modes, offering greater control for advanced users.
- Sequator: Another excellent free tool, particularly good for noise reduction and combining sky and foreground elements.
Enhancing Wide-Angle Night Sky Photos: Contrast, Color, Noise Reduction
Single wide-angle night sky images, such as those of the Milky Way, benefit significantly from careful adjustments in a photo editor. The goal is to reveal hidden details, manage noise, and ensure natural-looking colors.
- Noise Reduction: Astrophotography often involves high ISOs, leading to noise. Use luminance and color noise reduction tools carefully to preserve detail while smoothing out grain.
- Contrast and Clarity: Boost contrast and clarity to make the Milky Way stand out from the background. Avoid over-processing, which can lead to an artificial look.
- White Balance: Fine-tune the white balance to ensure stars appear white and the sky has a natural cool tone, often achieved by adjusting the Kelvin temperature.
- Dodge and Burn: Locally lighten brighter areas of the Milky Way and darken the surrounding sky to create depth.
Bringing Out the Details in Constellations
While often less dramatic than the Milky Way, constellations can be enhanced to highlight their patterns and brighter stars. This involves subtle adjustments to contrast and clarity, along with careful color grading.
- Selective Adjustments: Use masks or brushes to apply local adjustments to specific constellations, increasing their visibility without affecting the entire sky.
- Star Definition: Gently increase clarity or sharpness to make individual stars pop, but be wary of over-sharpening, which can introduce artifacts.
- Color Saturation: A slight boost in saturation can bring out the natural colors of stars (e.g., blue for hot stars, orange/red for cooler ones).

Advanced Tips for Stunning Astrophotography Results
Once you’ve mastered the basics, several advanced techniques and considerations can elevate your astrophotography from good to truly exceptional. These tips focus on maximizing detail, managing environmental challenges, and refining your creative vision.
Integrating Landscapes and Foreground Interest
A compelling astrophotograph often features a strong connection between the celestial and terrestrial. Don’t just point your camera at the sky; think about how the landscape interacts with the stars. This might involve light painting the foreground, capturing a silhouette, or blending separate exposures for the sky and foreground.
- Dynamic Range Blending: For scenes with a bright foreground and dark sky, consider taking two separate exposures (one for the sky, one for the foreground) and blending them in post-processing for optimal detail in both areas.
- Leading Lines: Use elements in the foreground (e.g., a path, a fence, a river) to lead the viewer’s eye towards the celestial subject.
Dealing with Dew and Cold Weather Challenges
Long nights under clear skies often come with cold temperatures and condensation. Dew can quickly fog up your lens, ruining your shots. Proactive measures are essential to combat these environmental challenges.
- Dew Heaters: Invest in a dew heater (a band that wraps around your lens and gently warms it) or a lens hood to prevent condensation.
- Camera Protection: Use rain covers or plastic bags to protect your camera from moisture if humidity is high.
- Battery Warmth: Keep spare batteries in a warm pocket to extend their life in cold conditions.
Patience and Persistence: The Keys to Success
Astrophotography is inherently challenging, requiring patience, persistence, and a willingness to learn from trial and error. Weather can be unpredictable, compositions can be difficult to find in the dark, and technical settings demand precision. Embrace the process and the learning curve.
- Practice Makes Perfect: The more you shoot, the better you’ll become at judging settings, focusing in the dark, and composing compelling images.
- Review On-Site: Regularly check your images on your camera’s LCD (zooming in to 100%) to ensure focus and exposure are correct before packing up.
- Enjoy the Process: Remember to take moments to simply look up and appreciate the incredible beauty you are attempting to capture.

Conclusion: Your Journey Under the Stars
Astrophotography is a journey of discovery, blending technical skill with artistic vision to reveal the hidden wonders of our universe. Whether you’re chasing the elegant arcs of star trails, the sprawling majesty of the Milky Way, or the subtle beauty of constellations, the principles remain consistent: meticulous planning, precise execution, and thoughtful post-processing. From selecting the right gear—be it a high-end DSLR or a capable smartphone—to mastering exposure settings and embracing the power of stacking, every step contributes to transforming the invisible into the unforgettable.
The night sky offers an infinite canvas, and with the techniques outlined in this guide, you are now equipped to embark on your own celestial photographic adventures. Remember that patience, practice, and a deep appreciation for the cosmos are your greatest assets. So, pack your gear, find a dark sky, and let your lens capture the breathtaking grandeur that awaits above.
Frequently Asked Questions (FAQ)
- Q1: What is the “500 Rule” in astrophotography?
- The 500 Rule is a guideline used to determine the maximum shutter speed you can use before stars begin to appear as trails rather than pinpoint dots due to Earth’s rotation. You divide 500 by your lens’s focal length (e.g., 500 / 20mm = 25 seconds). For crop sensor cameras, a “300 Rule” or “400 Rule” is often recommended due to the narrower field of view (e.g., 300 / (focal length * crop factor)).
- Q2: Can I really take good astrophotography photos with just a mobile phone?
- Yes, absolutely! While professional cameras offer more control and sensor size advantages, modern flagship smartphones, especially when paired with a sturdy tripod and a manual camera app, are capable of capturing impressive star trails and wide-angle night sky photos. The key is manual control over settings, long exposures, and stable support.
- Q3: What’s the best time of year and location to shoot the Milky Way?
- The
Independent gear note: Camera, lens, and brand names are used for identification and comparison only. Moon Station is not affiliated with, sponsored by, endorsed by, or authorized by the mentioned manufacturers or rights holders. Confirm current specifications, compatibility, warranties, and prices with official or qualified sources before purchasing equipment.